Dubbing Vinyl Albums to CD
Frequently Asked Questions (FAQ)
My Dubbing Vinyl Albums to CD page generates quite a bit of mail. Some of the questions are quite good, as they point out some inaccuracy or relate to points that I have not made quite clear. Sometimes there are suggestions for improving the process. Other suggestions, however, run contrary to my original intent. For example, one person suggested that it would be easier to do a certain step if I used CD Architect 5.0, from Sonic Foundry (now owned by Sony Pictures Digital). Now, CD Architect is great software for making CDs, even if it doesn't include some basic tools, but it also costs over $200! I think you get my point.
To help people understand the process and produce better CDs, I've put together a FAQ. Some of these questions are taken from mail I have received, while others are just an effort on my part to make the process a little easier for the average computer user. If you have any questions you would like to see added to the FAQ, please let me know.
1. Why would I want to dub albums to CDs?
2. Why can't I do this with one of the media tools that came with my computer?
3. Why would I want to use a different sound card than the one in my computer?
4. Can I use this process with other recorded media?
5. Can I plug a turntable directly into my computer? My sound system?
6. What if I don't have a phono preamp?
7. Can I improve the sound from my vinyl albums?
8. Can I plug my tape player directly into my computer?
9. Can I improve the sound from my tapes?
10. Why should I use GoldWave as my audio file editing program?
11. Why should I record and save my audio files in WAV format?
12. GoldWave seems so complicated to use. How do I get started?
13. What is the GoldWave "Device Controls" window?
14. How do I reduce background noise on vinyl albums and hiss on tapes?
15. How do I remove or reduce pops and clicks on old vinyl albums?
16. I hear a bad humming noise in the background. What is it and how do I get rid of it?
17. How do I record songs to CD without any pauses between them?
18. What is the background image on this page?
19. How do I record songs to CD without any pauses between them?
20. Should I turn up the bass and treble when I process the WAV files?
1. Why would I want to dub albums to CDs?
There are several reasons. First, you will find that there are many albums that are not available on CD that you would like to have in that format. (Under the "Fair Use" provisions of US copyright law, you may make recordings of albums you own for your own personal use.) Second, you may have audio tapes from family celebrations, school plays, or other events that you wish to enhance and preserve.
In my experience, it is extremely difficult to find ANY recordings of most regional bands from the 1960s and 1970s. For example, a group called The Georgia Prophets was very popular in the Southeastern United States in the mid-1970s, but none of their albums has ever been issued on CD. In fact, the only recording of theirs I have ever seen is an 8-track tape (remember those?) in rather rough shape. I now have a nice, clean-sounding copy of the album on CD, properly indexed with the track numbers. Problem solved.
Return.
2. Why can't I do this with one of the media tools that came with my computer?
You may be able to. Windows XP, for example, includes many media tools and your computer may already have everything required to make good digital recordings. But I wouldn't bet on it.
When I first started working on this as a project, I was using a Pentium II 300 MHz processor and 64 MB of RAM. I was also using Windows 95 and a 16-bit sound card. My goal was to find a cost-effective way to make good-quality CD copies of vinyl albums, and I needed to find a way that would work on computers that were nowhere near "state-of-the-art." I think that I succeeded.
Recently, I even tried one of the "all-in-one" programs that records an audio signal and then automatically breaks the audio up into separate tracks for recording. The software sucked!! For one thing, it was not a holistic approach. If you weren't getting a clean audio signal into the computer sound card, too bad. If you had rumble (which isn't usually present on audio sources other than vinyl albums), it was up to you to figure out the solution. For another thing, the program was obviously intended for digital recordings from digital video tapes, digital media, MP3 files, and so forth. It did a lousy job on the one thing I wanted to use it for: dubbing vinyl albums.
Finally, your sound card probably isn't the best unit to use for this purpose. Trust me on this.
Return.
3. Why would I want to use a different sound card than the one in my computer?
Most manufacturers of sound cards for non-professionals place their emphasis on sound OUTPUT, not input. Gamers and multimedia users want digital signal processing and multi-channel outputs for their games and surround sound media. They know that audio inputs are more commonly used with microphones for web cams or for adding narration and background music to media presentations. These uses simply do not require high-quality audio. This is particularly true of motherboards with on-board audio. The emphasis will be on output quality, and you will be lucky to get even relatively noise-free recordings.
What we want is a high-quality, low-noise audio input in simple two-channel stereo. The sound card must have full-duplex operation (records and plays back simultaneously.) We also want to defeat the automatic gain control (AGC) on the sound card. AGC varies the input level automatically to compensate for varying audio source signal levels. It automatically increases the volume when signals are low and decreases them when volume is high. This creates problems for us when we are trying to adjust input levels and keep noise to a minimum on our recordings. The sound card will increase the volume between songs, for example, and this will make the record's surface noise more noticeable. Most sound cards have a method of defeating the AGC, but many cards, including most Creative sound cards, install with the AGC turned on as a default setting. Whatever card you use, make sure to find out how to defeat the AGC and do it!
So, which sound cards should you consider? Hard question to answer. I personally find that the Turtle Beach Montego (not the Montego II) works well for me. I also like the Creative Sound Blaster Live! Gamer, but make sure to turn off the AGC on the I/O volume control mixer. I'm sure that there are other sound cards that will do the trick, but there are also a lot of cards that will seriously disappoint you, so choose carefully.
Return.
4. Can I use this process with other recorded media?
Of course. You can use these methods for reel-to-reel tapes, 8-track tapes, cassette tapes, DVDs, laserdiscs, VHS tapes, Betamax tapes, or just about anything with an audio output. The major difference between vinyl albums and these other sources is that the output from a turntable differs from them in its signal characteristics.
One word of advice: Do not record material to intermediate media if you can possible avoid doing so! You may be tempted, for example, to record an album to a cassette and then carry the cassette over to your computer to make a CD. This is always a bad idea. You want to use the best source material possible, and every generation of media you put between the original source and your CD will negatively affect the quality of the finished product. If your computer is in a different room from your sound system and turntable, disconnect the turntable and take it to your computer.
Return.
5. Can I plug a turntable directly into my computer? My sound system?
No, with very few exceptions, you cannot plug your turntable directly into your computer. A magnetic phono cartridge has a much lower output signal than the "line level" outputs from tape decks and players. In addition, the frequency response of the output from the cartridge must be adjusted using a recording industry standard called the "RIAA replay curve." This is why receivers and integrated amplifiers have dedicated inputs for phono cartridges. You should plug your turntable into the phono inputs of your receiver, preamplifier, or amplifier and then connect the "tape record" outputs to your computer sound card's line inputs. We use the "tape record" outputs because they are not affected by the position of the volume control or any tone control settings on the unit. Our goal is a plain, flat, vanilla ice-cream audio signal from the turntable (phono preamp) to the computer sound card.
Return.
6. What if I don't have a phono input? What if my computer is too far away from my sound system?
This might even work out better for you. Some new sound equipment does not come with phono inputs, since vinyl albums are getting rarer and rarer. Or, you might have a phono input, but your sound system is at one end of the house and your computer is at the other. The solution to both problems is a separate phono preamplifier unit. Phono preamps are readily available from many different sources. They range in quality from simple Recoton units (less than $40) to handcrafted audiophile units costing over $1000. For our purposes, a simple unit will do fine.
When selecting an inexpensive preamp, do some research to find out what others think of it. The Recoton SP-2 unit is probably a good choice, though you may find less-expensive units available through many sources. Preamps with separate power supplies tend to have less noise. In looking at product specifications, lower distortion, higher channel separation, and higher signal-to-noise ratio are all better. Installing the unit is extremely easy. If you are connecting the turntable to your sound system, you will use a simple stereo audio patch cord. If you are connecting it directly to your computer, you will need an adapter to change the RCA phono plugs to a 1/8" stereo mini-plug. Be sure to connect the ground wire from the turntable to either your receiver/amplifier or to the phono preamp. You will need to check to see if you have any residual hum once you've made your connections.
Return.
7. Can I improve the sound from my vinyl album?
Yes, in many different ways. The first priority is to make sure that your turntable is set up correctly. Locate the turntable on a flat, level surface. Check that the platter is level by placing a small bubble level on the record or directly on the platter. Double-check your stylus tracking pressure using the manufacturer's instructions. Set the anti-skate adjustment (if you have one) appropriately. Keep room vibrations to a minimum while you are recording.
If you don't already have a good-quality record cleaner and a stylus brush, go get them and use them. Use distilled water or whatever fluid is provided to clean the record surface prior to playing. Carefully clean the stylus with the brush. If you have an audiophile music store in your area, they may have equipment to professionally clean your album for a nominal fee. Once you clean your album, store it in a rice paper (or other low-fiber non-static) inner sleeve.
If the album itself is warped, try storing it vertically between large books or between other albums for a few days.
WARNING!! From this point forward, you are taking a risk and I cannot be responsible for the results! If you follow my suggestions, you may damage or destroy your albums! Proceed with caution!
Sometimes albums are almost unplayable due to surface noise and scratches or warps. Here are some ways you can try to fix these problems, if only temporarily. This may allow you to make ONE GOOD RECORDING:
You may be able to cure a warp in an album by placing the vinyl album itself between two pieces of window glass and putting it in an oven. Make sure your pieces of glass extend a couple inches beyond the album. Use only window glass...DO NOT use anything heavier than single pane window glass! Place the album between the glass panes and allow it to sit for several hours. (You may find that this will flatten it enough without going any further.) Heat your oven to its minimum temperature, but no hotter than 150 degrees F. If you have an accurate oven thermometer, try to get the oven to about 120 degrees F. It should be cool enough to touch. Open the oven door and place the glass panes and album on the center rack of the oven. Be VERY careful, as the glass may break due to the change in temperature. Leave the door open and let the oven cool. When the oven is cool, remove the glass panes and album to a cool (between 70 and 75 degrees F) part of the house. Lay them flat on a table or other surface and allow them to cool for several hours. The album should now be flat, though it may be a little out of round. It should stay this way, so you can make a recording, but it will warp again very easily, so make sure to get a good recording while you can.
If your album has a lot of surface noise or problems with maintaining stylus contact with the groove, you may want to try playing it when it is wet. This often helps, but you will probably end up with an unplayable record once the gunk hardens in the record grooves. To play it wet, get everything ready to record. Mix about a cup of distilled water with just a drop of Murphy's Oil Soap. Using a cotton ball or cosmetic brush, gently apply the solution to the first side of the album as it sits on the turntable platter. Be careful not to get the solution on the turntable or mechanism. Now play the album normally and record it. Do not try to apply any additional solution to the album as it plays. When it reaches the end, quickly clean the phono stylus while it is still wet. Then blot the first side dry and turn the album over. Repeat the process for the other side. You can try to clean the album afterwards by carefully rinsing it in distilled water, but I can't promise you that it will ever play again. Really.
Return.
8. Can I plug my tape player directly into my computer?
Yes.
Return.
9. Can I improve the sound from my tapes?
Yes. There are a couple ways in which you can improve the sound quality or correct problems with older tapes, particularly reel-to-reel, 8-track, and cassette audio tapes. First, make sure you clean the playback head thoroughly with commercial head cleaning fluid. Use a cotton swab and make sure it gets sparkling clean. Next, clean the drive capstan and pinch roller, if they are accessible.
One problem with old tapes is mechanical noise. Older cassette tapes are notorious for mechanical noise. Mechanical vibration from the slip sheets or the hubs is translated into tape vibrations that affect the recorded audio. In many cases, you can simply disassemble a cassette and move the tape and hubs to another newer cassette shell. This obviously works best if you use a new shell from the same manufacturer. Another possible solution is to place the tape in a sealed container with a moist paper towel for a few hours. This will often get enough moisture into the cassette or cartridge to significantly reduce the vibrations.
Another problem with tapes is head alignment. The tape machine's playback head can usually be adjusted by the user in at least two different directions: height and azimuth. If you feel that you are competent to do this, you may be surprised at the positive results you can get. If possible, try to locate a service manual for your model of tape machine. Then identify the adjustment screws for the playback head(s). Using the actual tape that you are planning to record, adjust the head(s) while listening to the sound on a set of quality headphones. You will probably find that some slight adjustments improve the sound quality a great deal. When you are satisfied with the adjustments, record from the tape and then adjust the screws back to their original positions. (You DID keep track of that, didn't you?) This method works particularly well with 8-track tapes, because the heads in most 8-track players move up and down to play the different tracks. The heads get out of adjustment and sound quality deteriorates. The 8-track tapes also vary greatly in the accuracy of the track location on the tape itself. A properly-adjusted 8-track player actually has very acceptable sound when it is optimized for a particular 8-track tape cartridge.
Return.
10. Why should I use GoldWave as my audio file editing program?
Whether or not you use GoldWave is your decision, but I personally find that GoldWave is powerful, stable, and inexpensive. It will do everything that you need to do for less than $50 (US). I've used it for several years now and it has always done the job for me. It will record from any source available on the PC, digitally process the audio file(s) in just about any way you desire, and then edit the files into individual tracks (or assemble individual files into a big composite track.)
Return.
11. Why should I record and save my audio files in WAV format?
WAV files are going to give you the best fidelity for your audio recording and editing. Create your WAV files as 16-bit, 44.1 KHz sampling rate files and they will be comparable to CD-quality audio. When you convert an audio file to a "compressed" format (MP3, RealAudio, etc.) you will compromise the audio quality of the music. It may be nearly undetectable to most individuals listening to it, but you are ARE "throwing away" some information about the audio signal. After all, the MP3 compression algorithm reduces the file size by a factor of from 10 to 14, so you know very well that you're tossing out some data on the audio. Furthermore, if you convert the compressed audio back to a WAV file again, the quality of the conversion will depend on the converter engine and application you are using. Once compressed, the audio can NEVER be restored to its original quality...period! So do yourself a favor and work with the audio in an uncompressed WAV format file. Convert it to a compressed file format after you're done editing, if you wish, but I would keep the original WAV files as my highest-quality source material in case I need it again.
Return.
12. GoldWave seems so complicated to use. How do I get started?
Well, I can give you some hints and point out some things that confused me when I first started using it, but that's about it. If you have any questions about specifics, contact GoldWave directly or drop me an e-mail and I'll try to help. Here we go...
|
Recording an audio file:
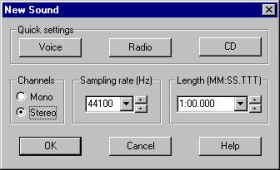
Select "File", "New", and you should get the New Sound dialog box shown below. Hit the "CD" button and it will default to the settings shown, which are what you want to use for creating a CD. Enter (or select) a "Length" for the new file. Be sure to make it long enough, but not too long. GoldWave will take a few moments to create a file of the appropriate size and you want to keep it as small as possible to make it easier to work with. If you know that your album side is 18 minutes long, for example, choose 20 minutes for the file length. This will allow you to cue up the album and restart it again if you slip with the tonearm. Hit "OK" and GoldWave should create your working file.
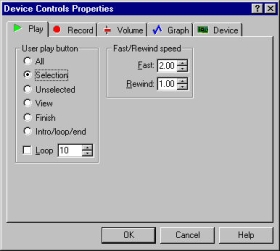
You should now have a Device Controls box on your screen, as shown below. This will act as your "recorder" control to start, stop, and adjust the audio recording. Select the strange-looking button indicated by the yellow arrow and you will get another dialog box for setting the Device Control Properties.
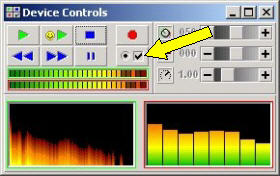
The Device Control Properties dialog box is where you make all your adjustments to record and playback using GoldWave. For right now, just go to the "Volume" tab and select the audio input source you want to record. You can also adjust the volume here. In my experience, you will want to keep the volume level pretty high for most sound cards. You can take a look at the other tabs to see what other adjustments you can make, but the default settings will probably work just fine for you.
Now close the Device Control Properties dialog box and prepare to record. Select the Record button (red circle) while you hold down the CTRL key on your keyboard. GoldWave should start recording and the cursor should start moving across the graphic file on the screen. Now cue up or start your audio source (turntable, tape, or whatever.) If you make a mistake, just start it again. You can always edit out the false start from the final file. When the source ends, just hit the Stop key (blue square) and GoldWave will stop recording. It's a good idea to go ahead and save the file now, since it has been buffered and you want to make sure that the file is safely on your hard drive.
|
|
Editing the audio file:
This confuses a lot of people. Think of the editing process as working on a Microsoft Word document. In Word, you have several different document views to choose from. You can highlight text and then edit, delete, copy, spell-check, or change the highlighted portion as desired. It is the same with GoldWave...we will have to change between views and we will highlight sections of the file to edit them.

The toolbar above is typical of GoldWave, but it will vary slightly with the version you are using. Perhaps the most important buttons on the toolbar are the DEL, VIEW, TRIM, SEL, and ALL buttons. These will change your view of the file and what happens to the highlighted section. (The highlighted section is usually shown in light blue, though this can be changed under Preferences.) ALL will change the view to show the entire file. SEL will change the view to show the highlighted (selected) part of the file. VIEW will change the highlighted (selected) area of the file to be the same as the visible portion of the file in the current view. DEL will delete the highlighted portion of the file. TRIM will delete everything outside the highlighted section of the file.
At this point, people usually say, "Well, how the Hell do I highlight a section of the file? I've been trying to drag my mouse over the file like I do in Word and it's all screwed up!"
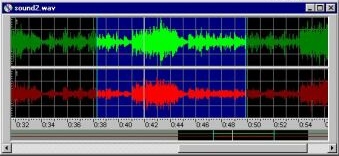
That's a good question. In GoldWave, you select a section by selecting a start point and an end point. A left-click on the file display will place a start point and a right-click will place the end point. Of course, the start point must always be to the left of the end point. Here's a sample of a highlighted area in an audio file. If you need to change the start or end points, you can either place them again or you can drag them by holding down the right or left mouse button and dragging them to the appropriate location(s).
With the exception of a few commands, any editing you do will ONLY affect the highlighted area (or, in the case of TRIM, it will affect/delete the file portions outside of the highlighted portion.) We'll discuss some of the more useful editing and processing commands in the following section. Note, though, that you can listen to the highlighted section at anytime by pressing the Play button (green arrow) on the Device Controls dialog box. This allows you to check your work and verify that you have selected the correct section of the file. |
|
Useful commands and functions:
Like most software applications, GoldWave has about ten times as many features as we'll ever use. I've already discussed the DEL, VIEW, TRIM, SEL, and ALL buttons in the previous section. Here are some of the other features that I use on a regular basis.
Fade In/Fade Out. They do just what it sounds like. At the end or beginning of a song, you may want to fade the music in or out. When you select part of the song, this function will increase/decrease the sound level from/to zero, as appropriate.
Copy 2. This saves the highlighted portion of the audio file as a brand-new file and prompts you for a new file name. This is ideal for when you want to create a single audio track with one song. Just highlight the song (plus a few seconds on each end) and then copy it to a new file. After trimming the ends of the song to get rid of whatever material was on either side, you're ready to go.
Maximize Volume. This is under "Effects", "Volume", "Maximize". This is helpful in "normalizing" the volume of the recording after it has been made. Before applying this, select and highlight the entire file. (You can apply this to just a portion of a file, but you may get some very undesirable results.) Once you open this function, it will automatically scan your file and determine the loudest point in the file and the RMS (root mean square) volume level. (You can read more about what these figures represent in the Help section of GoldWave.) I usually try to increase the loudest point of the file to 0.900 and the RMS to between 0.100 and 0.200. You will have to play with this to get a good feeling for the effect, but you will quickly see that you tend to perceive two pieces of music as having similar overall volume if the RMS values are close.
Pop/Click Filter. This is under "Effects", "Filter", "Pop/Click". This is helpful in eliminating pops and clicks from vinyl albums. The default setting is usually pretty good, but here's a helpful piece of advice: Apply this filter only to the quiet sections of the audio file. Loud music will mask most pops, clicks, and surface noise on albums. To eliminate the obtrusive pops and clicks during quiet portions of the music, just highlight the sections and apply this filter. This will also allow you to adjust the filter to be more aggressive without affecting the rest of the song. I use this a lot for quiet guitar and piano introductions.
There are several other neat filter functions, but I urge you to avoid using them excessively. It is VERY easy to make the music sound much worse than it did originally. Dynamic noise filters and equalization can be abused and misused by the inexperienced. |
Return.
13. What is the GoldWave "Device Controls" window?
It is the control interface that allows you to select an audio input source, adjust the audio volume, change the physical sound device, play back the file, and do just about anything else other than the actual audio editing. It is described in the section above.
Return.
14. How do I reduce background noise on vinyl albums and hiss on tapes?
There are a couple different types of audio filters that you can use to do this. Most of them fall into one of two types: static or dynamic.
Static filters usually limit the high-frequency content of the material by applying a fixed high-frequency roll-off at a predetermined point. The roll-off can be very steep or relatively shallow. (The roll-off is usually expressed as "X dB per octave" above a certain frequency. The larger X is, the steeper and more severe the roll-off.) In GoldWave, you can adjust these values in Effects, Filter, Noise Reduction.
Dynamic filters vary greatly in their design and purpose, but they tend to apply the filtering when the sound level drops to a point where the noise might be noticeable. The GoldWave NoiseGate is a good example of a dynamic filter. You can adjust it to address your specific noise issues. One suggestion...try it on a small piece of your audio file first before applying it to the entire file.
Return.
15. How do I remove or reduce pops and clicks on old vinyl albums?
There are several pop/click filters available from different sources. I tend to use either the GoldWave Pop/Click Filter (described above) or Arboretum Systems' RayGun. RayGun has a very simple user interface and does a very good job of reducing pops and clicks, as well as applying several other noise filters. As far as I can see, RayGun has only two disadvantages: (1) It is expensive...almost as much by itself as GoldWave costs; and (2) you cannot apply it to only a section of the audio material. As I have previously said, pop and click filtering can be very effective even when it's only applied to a few quiet sections of the audio material. Applying it to the entire file might have a negative impact on the overall sound quality.
Return.
16. I hear a bad humming noise in the background. What is it and how do I get rid of it?
Hum from 60-cycle household current is a common problem. It can arise from several different sources and you will probably need to experiment to determine the best way to address your hum problem. One of the most common causes of hum is the electrical connection of the computer chassis or sound card to the audio source. The best way to address this is to use a ground loop isolator, as described on my Dubbing Vinyl Albums to CD Page. This will electrically isolate the computer from the audio source.
However, you may also find that the source of your hum has nothing to do with the connection of the computer to the audio source. It may be due to some more common problem. If you are dubbing an album from a turntable, make sure that the ground wire for the turntable is connected to the chassis of the receiver/amplifier/preamplifier. Route your audio signal cables away from transformers, power supplies, electrical extension cords, and fluorescent lights. In some cases, you may even find that you need to disconnect a third piece of equipment form your audio source to eliminate the hum. (When I record from my main sound system CD player, I must disconnect my laserdisc player or I get a terrible hum.) Don't be afraid to experiment to determine where the hum comes from.
Return.
17. How do I record songs to CD without any pauses between them?
The key to doing this successfully is planning it in advance. This is typically what you want to do when you have a live concert album and you want to be able to jump from track to track, but you don't want any pauses in the performance. There are two ways to do this with GoldWave.
The first way is basically a completely manual way and I have already described it on my Dubbing Vinyl Albums to CD Page. In this method, you select the tracks by highlighting them and then "Cut" (NOT "Copy 2") them and save them. Do this only after you have applied all of your filtering, processing, and trimming to the entire master audio file. If you cut the master file into separate tracks before you process it, you will get disconcerting changes in levels and sound characteristics between songs. Also, make sure to tell your CD burning software NOT to "normalize" the audio tracks when burning them.
The second way is to use GoldWave's Cue Points (under Tools). You can manually place cue points in the master file after you process and edit it. (Again, do all of your filtering and processing BEFORE you start dividing the file into tracks. Also make sure that you have trimmed the ends of the master file before your place the cue points. The cue points are based on the time index in the file. If you trim an end from a file, it will shift all of the cue points in one direction and they will no longer be accurate.) Once you have the cue points in place, select Tools, Cue Points, Split File. GoldWave will then divide your master file into smaller files at the cue points and give them names based on their order in the master file. The end result is a set of individual audio tracks that can be played continuously. Make sure that you tell your CD burner software to burn the tracks WITHOUT PAUSES!
Return.
18. What is the background image on this page?
It's the album cover for The Edgar Winter Group's Shock Treatment (1974). A rarity at the time it was released...a pop album with actual, discernible melodies.
Return.
19. Any other last hints or suggestions?
Yes, I have a couple. First...practice, practice, practice. Create a small (less than one minute) file from a noisy album and experiment with it, applying filters and whatever. This will give you a better feel for what GoldWave can do. Second, practice selecting and editing tracks by doing an actual project. Just take an album at random and start making a CD from it. Finally, don't try to make the edits absolutely perfect. When you are first dividing the master audio file into individual tracks, just use the Copy 2 function and pull out the individual songs with plenty of extra on each end. I don't even bother listening to see where the songs start and end...I'll do that later as I trim the ends of the individual songs. In other words, be fussy where you need to be fussy, but don't overdo it. Being fussy takes time and you will get frustrated.
Return.
20. Should I turn up the bass and treble when I process the WAV files?
I wouldn't. You can always emphasize (or de-emphasize) the bass or treble when you are playing the CD. But it is virtually impossible to remove the heavy bass or shrill treble you've added. So, my advice is...keep your hands off the tone controls/equalization when you are processing your audio files.
Return.
Return to Dubbing Vinyl Albums to CD Page
Return to Unterzuber.com Home Page
(c) Copyright 2003 by Unterzuber.com. All rights reserved. Contact: Webmaster