Dubbing Vinyl Albums to CD
NEW!! Due to popular demand,
I have created a
Dubbing Albums to CD FAQ
to provide more detailed information
and to answer questions.
Some of the best albums of the 60's, 70's, and 80's are still not available on CD. One example is Bram Tchaikovsky's Strange Man/Changed Man, which is doubtless the best album by the group/artist. Released in 1979, this album features former Motors members Bram Tchaikovsky (born Peter Bramall) and Nick Garvey with an assortment of power-pop. I'm not really sure why I like the album so much...the guitar work is not spectacular, the vocals are yeoman-like, and the songs are pretty standard fare. But the combination is impressive and there are plenty of hooks to sink your ears into. DECEMBER 2002 UPDATE!! This album was released as a CD in 1999 on a Japanese label and I now have a used copy. The sound is better than my home-made CD's, but not by much.
Strange Man/Changed Man
Bram Tchaikovsky (1979)
Other albums still not available on CD include some major works by Neil Young, The Last, The Bunch (an assortment of folk-rockers that included Richard Thompson, his future wife Linda Peters, and the legendary Sandy Denny), and the Knack. Their vinyl LP's are readily available, often in sealed condition, for a song. Check out E-Bay, or some of the more specialized sources on the net. If you're like me, you probably already have several old albums that you treasure, but cannot obtain on CD. Maybe they're by small regional bands, or the bands were one-hit wonders. In any case, you would love to be able to listen to them on CD in your home or car, with low background noise, no clicks or pops, and the ability to program or skip tracks. Or maybe you just want to share them with your friends.
About two years ago, I spent several weeks of my spare time experimenting with software and hardware to make CD's from vinyl albums. I wanted a method that was relatively inexpensive and that was available to just about anyone who owned a CD burner. I also wanted to improve the sound quality of the albums while preserving the fidelity as much as possible. In some cases, I was planning to play the original albums while wet, which meant that I would probably not be able to play them again after the initial dubbing session. (If you put distilled water on an album that is noisy or unplayable, the water will often reduce the surface noise and make it playable. Unfortunately, you usually end up with a glue-like residue in the grooves once the album dries. Soapy water works even better, but it is absolutely guaranteed that you won't be able to play your LP afterwards.) I also had some 8-track and cassette tapes that I wanted to transfer to CD and these presented completely different problems.
So here are the results of my experimentation. Was I successful? I think so. The CD's I make are quite good. Along the way I learned some critical lessons....
|
Lesson 1: If the album is available on CD anywhere in the world, go ahead and buy it. This is NOT a cheap and simple way to make CD's to avoid having to buy them. On the other hand, in some instances the vinyl albums sound better than the CD's. (For example, my vinyl copy of The Edgar Winter Group's Shock Treatment sounds much better than the CD issue.) In these cases, it may make sense to make a CD from the vinyl album. Lesson 2: This is one instance where you actually do need all the "computer power" you can get. Use the fastest CPU, the most RAM, and the best hard drives you can afford. You are going to be repeatedly editing and manipulating files as large as 400 MB. Just waiting for the files to read and write to the hard drive will often take several minutes. You can work with less-powerful equipment, but it will severely try your patience. Lesson 3: The speed and "quality" of your CD burner is not nearly as important as the type of sound card you have...and you do not need a fancy sound card. You are going to spend several hours dubbing and editing the CD tracks before you ever burn a CD. How fast the final CD gets burned is the least of your problems. Your sound card, though, will have to make the one-time conversion of analog audio into a digital audio file and it will be the key component in the whole process. Lesson 4: You will have to practice and experiment to reduce noise in the dubbed music tracks. This will take a lot of time, but there is no way around it. Keep at it and you will have a CD with excellent sound. I promise. |
1. Assemble appropriate software and hardware and test.
2. Capture album audio as WAV files on computer hard drive.
3. Normalize, filter, and equalize raw WAV files.
4. Identify and copy individual tracks as separate WAV files.
5. Edit individual tracks (fade-in, fade-out, etc.)
6. Burn final audio CD directly from WAV files.
1. Assemble appropriate software and hardware and test.
As I already said, you will want the best computer you can obtain. At a minimum, you want a 500 MHz Pentium-class CPU. Try to have at least 512 MB of RAM. (With enough RAM, you will be able to store the files in the RAM when you are working on them. This is the fastest way to edit.) Since you will be working with extremely large files, you also want the best hard drive(s) compatible with your machine. If you are going to do quite a bit of this, think about installing a 10,000 RPM Ultra3 SCSI drive or other high-performance drive. I AM NOT KIDDING ABOUT THIS!! You will be tempted to give up on the process when you find that it takes several minutes for every minor change you make to a WAV file as the file is laboriously written to the hard drive. UPDATE! NOVEMBER, 2003: Still don't believe me? I'm currently working on an audio file that was ripped from a live concert DVD. The audio file was ripped to an AC3 audio file and then mixed down to a single WAV file that is 1.42 GB long. Yes, that's right...one single audio file that is 1,420 MB in size! This isn't big compared to the typical DVD file size, but it is still rather cumbersome to work with.
Your sound card is your most critical component. You do NOT need a "47-Dimensional Ultra-Blaster 123 Super-Gamer" sound card. You do not want one, because it probably has all sorts of odd drivers and features that detract from what you want to do: capture high-fidelity analog audio signals and convert them to a digital stream. The high-end sound cards available in most computer stores are designed to do exactly the opposite...they provide "enhanced" multi-dimensional (unrealistic and artificial) sound output to speakers or headphones. There are also many professional-grade sound cards out there that will do a superb job of capturing analog audio signals, but they are more expensive and complex than what you need. What you are looking for is a full-duplex (records and plays simultaneously), low-noise, full-bandwidth card for a reasonable price. I personally use an old Turtle Beach (www.turtlebeach.com) Montego (not a Montego II) sound card. It is a PCI card using an Aureal Semiconductor chip and my real-world experience has shown that it does an excellent job. You can get one for less than $25 if you check E-Bay or some other sources. I tried three other cards and found they had various problems, including one that audibly "breathed" when the input signal varied in volume. The built-in sound features on some motherboards may be adequate, too, but I would check them out first by recording low-level music and listening to it through headphones for audible "artifacts". UPDATE!! I've recently started using the Creative SoundBlaster Live! cards in a couple of my computers. These also seem to work very well for capturing audio. The Live! configuraiton comes with front panel controls and optical connections, which are helpful if you are using a MiniDisc unit. The card itself is available as part of the Live! package or separately as the CT4760. Highly recommended.
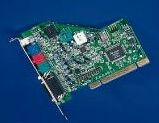
Turtle Beach Montego Sound Card
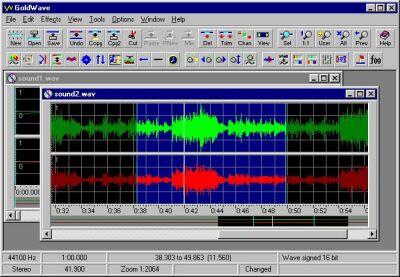
You do not have to spend a lot of money for your software, either. You need a simple audio editing program with basic filtering and processing capabilities. (After all, you are not going to be composing music or laying down rhythm tracks.) In my book, the best program out there is GoldWave (www.goldwave.com), which costs about $40 for single-user. It is practical, stable, and does everything you'll need. Heck, I still use a 1999 shareware version on one of my machines. GoldWave will capture the audio from the sound card and save it as a WAV file. It will then allow you to edit the WAV file using a visual display of the waveform. We'll discuss the best way to do this in subsequent steps. If you already have a copy of Sound Forge, Cool Edit, or some other sound/MIDI editing software, you can use it if you want to, but don't go out and spend hundreds of dollars when GoldWave does the trick for less. You're not going to be scoring a movie or anything.

GoldWave Toolbar and Controls
And just what is a WAV (.wav) file? Well, there are many different ways to save audio to a digital file and there are many audio file formats. A WAV file is the best way to faithfully preserve the audio signal for further processing and archiving. Properly configured, a WAV file captures the most information and the highest fidelity. Trust me on this...if you want to turn the music into MP3 files or some other compressed format, feel free to do so at some point in the future. But capture the audio in a WAV file initially so you have the best source material to work with. This also means that you should reconsider your idea for using a portable MP3 recorder or minidisc as an intermediate step to record the album. Both of these devices use some pretty severe compression techniques and you will definitely see some degradation in quality.
You will also need a few patch cables and adapters to connect your equipment together. Here is a diagram of a typical method of connecting your stereo equipment to your computer:
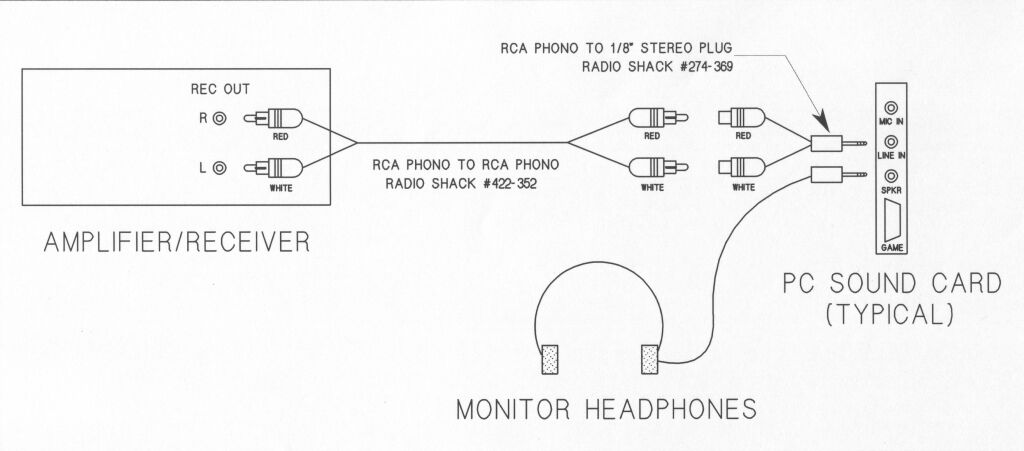
Typical Stereo Connections
(click on image to enlarge)
Be sure and take your time and run some tests. Record a few minutes of music and make sure that you can edit and play back the file. I like to edit it using headphones, as they help me to hear what the audio actually sounds like. At this point, there is a also a very good chance that you will find you have a problem...hum.
Hum will be obvious. In some cases, it will be simple to eliminate the hum. You can try changing your turntable or amplifier ground, or reversing the AC plug at the receptacle. However, it is quite likely that you are experiencing a problem with simply connecting the computer to the stereo. A difference in the electrical grounds of the two pieces of equipment or a phase differential in the power can cause a significant 60-cycle hum. The traditional way to handle this is to use an audio isolation transformer, which electrically separates the audio source from the sound card input. (Don't bother trying to eliminate the hum with a 60-cycle hum filter in the audio software after you've dubbed the music. You'll lose too much of the music itself.) Commercial audio isolation transformers ensure high-fidelity, but they cost hundreds of dollars. Instead, go to Radio Shack and buy a model 270-054 Ground Loop Isolator for $15.
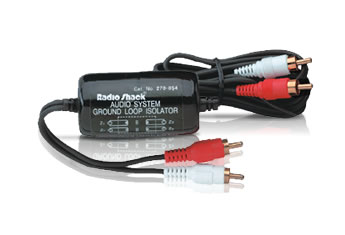
Radio Shack Model 270-054 Ground Loop Isolator
This unit replaces your patch cord and will electrically isolate the computer from the stereo. My experience has shown that the unit does a surprisingly good job of passing the full frequency range of the music, though you may want to "touch-up" the high and low frequencies a bit. One word of caution...the unit is not electrically shielded and will pick up hum from TV's, fluorescent lights, and other electrical equipment. I lay mine on the floor at least five feet away from any source of electromagnetic radiation and it does just fine. (This unit is especially nice because it includes the RCA to stereo 1/8" adapter, an item that would cost you almost $5.00 if you purchased it separately.)
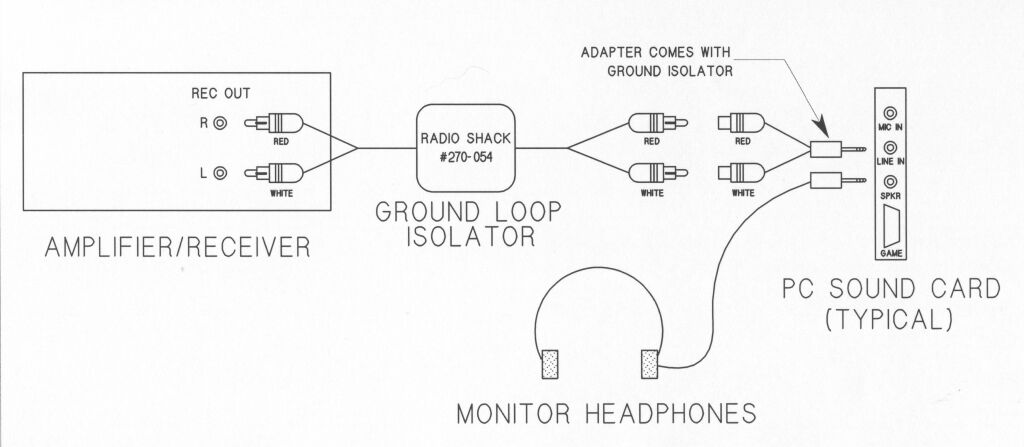
Stereo Connections with Ground Loop Isolator
(click on image to enlarge)
I cannot emphasize how important it is to determine if you have a hum problem BEFORE you record and edit an entire album. You will have completely wasted your time if you create a music CD with a built-in 60-cycle hum. Remember, if you DO NOT have a hum problem, don't use the ground loop isolator
2. Capture album audio as WAV files on computer hard drive.
Clean your vinyl album, neutralize the static, and take any other steps necessary to make sure that you have the best sound possible. Start up the GoldWave Recorder and create an empty audio file with the desired bit-sampling rate and recording time. (Hopefully, you figured out how to do this in the previous step.) Start recording on the computer prior to starting the album on the turntable. Don't worry about miscuing the album...we'll be able to clean it all up later. You can even start the album again if the tonearm skips a groove or two. Let the computer record the whole side of the album and STAY IN THE ROOM LISTENING TO THE MUSIC! There are few things more frustrating than processing the audio files and then discovering that you had a skip or two when recording the album. If you have a problem in playing the vinyl album, it's best you find out NOW!
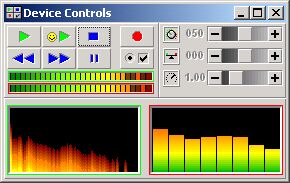
GoldWave Recorder Controls
When the album side is finished, you can go ahead and stop the recording. You will now have a HUGE (easily 300 MB) WAV file that will be your raw material for all future work. Again, it's a good idea to play back a few minutes of the file and listen to it through headphones to see if you have any objectionable background noise, hum, or other anomalies. From this point on, you will be spending a lot of time editing and processing the file, so make sure it's worth working on. I usually save each side of the album as a file titled "side1.wav" or some similarly-inspired name. Record both sides of the album at the same time...don't record one and then come back later and record the other. Again, trust me on this.
3. Normalize, filter, and equalize raw WAV files.
This is worth the price of admission alone: normalize, filter, and equalize your audio files at this stage, one album side at a time. DON'T wait until you create the separate tracks to do this!! I won't go into all the details here about how to do this in GoldWave. You should have already read the instructions. But I will give you a few suggestions:
The first thing I do is normalize the audio files. Using GoldWave, select Effects, Volume, and then Maximize. GoldWave will scan your file to determine the maximum, minimum, and average sound levels (volume) of the audio signal. You will be able to select the maximum volume for the file (usually between .9 and 1.0) and then GoldWave will adjust the signals to their optimal volume settings. You want the audio to be loud enough to overcome noise, but not to exceed the capabilities of the CD or the playback equipment. Do this once for each album side or audio file. If you're careful, you'll save this processed file with a new name (like "side1a.wav") so you have the original to go back to. Be sure to make a note of your settings. Once you have divided your file into separate tracks, DON'T slip up and let your CD burning software or MP3 converter normalize the tracks again! When you normalize the entire side of the album or cassette, the songs will have appropriate volume levels in relation to each other, but if you normalize the individual tracks, each track will be maximized relative only to itself. A slow, quiet song will be scanned and the volume will be increased to match the maximum and/or average levels of a louder song. This is very disconcerting if you are dubbing a live concert album.
The next thing I do is filter the file, if it needs to be filtered. GoldWave has several filters that remove pops, clicks, and surface noise. Try them out and adjust them as necessary, but be careful not to judge their effects during the "silent" portions of the album between songs. We'll handle that later in another way. Judge your settings based on the quiet sections of the music, where you would normally hear a little noise from a vinyl album. I also have a separate noise reduction program called Ray Gun (www.arboretum.com) which is specifically intended for reducing noise on vinyl albums. In extreme cases, I close down GoldWave at this point and apply Ray Gun directly to the WAV files. Again, make a note of your settings.
A couple hints here: Use a light touch when filtering. Most of the perceptible noise will disappear when you trim the tracks later in this process. Also, if you hear hiss or background noise during quiet sections of songs, consider highlighting just the quiet section and applying the noise filter to just that section. If you are unsure of the effect of a filter, copy a short but noisy piece of the WAV file to a separate test file and experiment on it. The test will go much faster with a 10-second clip than an entire song.
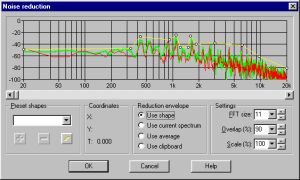
GoldWave Noise Reduction Controls
Finally, I equalize the files to my personal taste. This is my opportunity to give the music a little more bass or to "punch up" the vocals in the midrange frequencies. You can also compensate for the slight loss in high and low frequencies caused by the ground loop isolator. My advice is to be conservative. You can always give the music a little more bass using tone controls when you play it back, but it's difficult to adjust excessive bass when you added it to the CD track permanently. Even more important, note your equalization settings or save them to a profile so you can use them on other files.
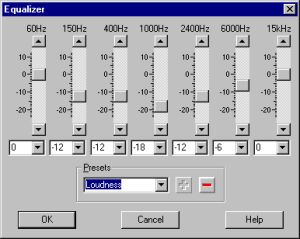
GoldWave Equalization Controls
There was a reason that we did all of this to the entire album side at one time. By doing so, we made sure that the entire album side will sound the same, with the same amount of filtering and the same equalization characteristics. We also want to apply the same settings to the other side of the album, although we may find that the second side has a little more or less noise than the first. Repeat this process for the second side of the album.
4. Identify and copy individual tracks as separate WAV files.
Things are going to start moving a little faster now. We should have two high-quality recordings of the album, one for each side, and the recordings include the sounds of the tonearm cuing on the record and lifting off at the end. We now want to make individual tracks for our CD. Otherwise, we will not be able to go directly to certain songs or program the CD for custom play. Some CD-burning applications try to do this for you automatically. Trust me...you will not be happy with the result unless you have a tin ear or you're eight years old.
For this step, we need to copy the individual songs or tracks to separate files for further editing. Open the working version of the "side1.wav" file and you should be able to see the spaces between the songs. (See below if you want to make tracks segue continuously, without spaces, as with a live performance.) In GoldWave, you visually select the individual song using the right and left mouse buttons, making sure to OVERLAP the beginning and end of the song with several seconds of the songs to either side. You can also play the section to make sure you have it right. Using the pop-up menu and the "Copy To" function, save the selected portion of the file to a new file called "track1.wav" or some other reasonable name. DO NOT "cut" or "delete" the highlighted section!! Just create a new file for it and repeat for each of the other songs.
GoldWave Editing Controls
Once you have created a separate file for each track on the album, you can close the "side1.wav" file or copy it to a CD. We're through with it for now, but may need it later.
Making tracks to play continuously and without silence between the tracks is a little more difficult, but not much. Select the beginning and the end of each song very carefully, WITHOUT overlapping the adjacent song(s). Use the "Copy To" function to create a separate WAV file for the selection. Next, use "Delete" to delete the track from the original source WAV file. Once you have deleted the track, do not trim or edit the track(s) that were adjacent to it! Select the next track, use "Copy To," and then delete it...and so on for each song in turn. The idea is to create separate WAV files that can be seamlessly reassembled into a complete performance. DO NOT screw around with the volume levels or edit the track any further once you have done this! You will be very irritated at the changing volume levels and noise as you listen to the performance! Just go straight to the last step of burning your CD and make sure to select the "No Pause Between Tracks" option on your CD-burning software. There should be no perceptible pause between your tracks.
5. Edit individual tracks (fade-in, fade-out, etc.).
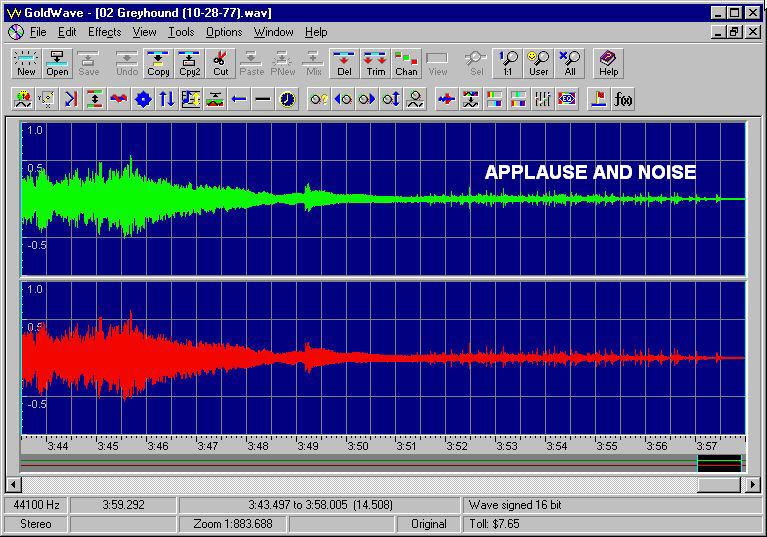
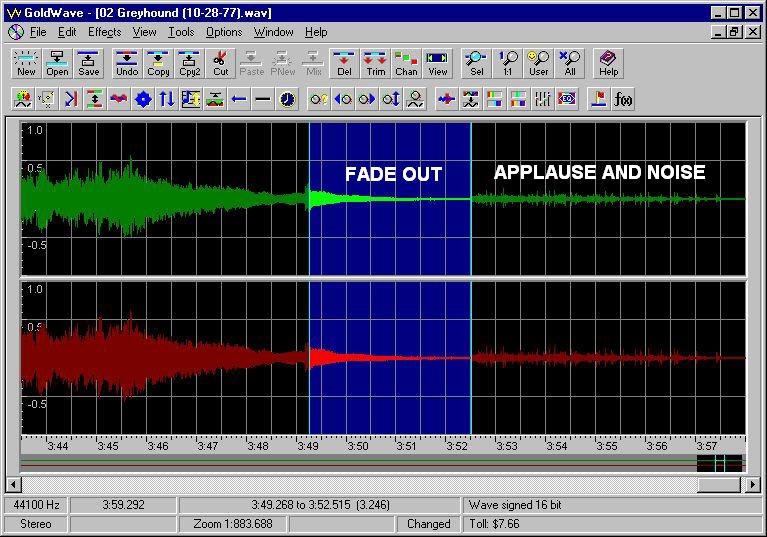
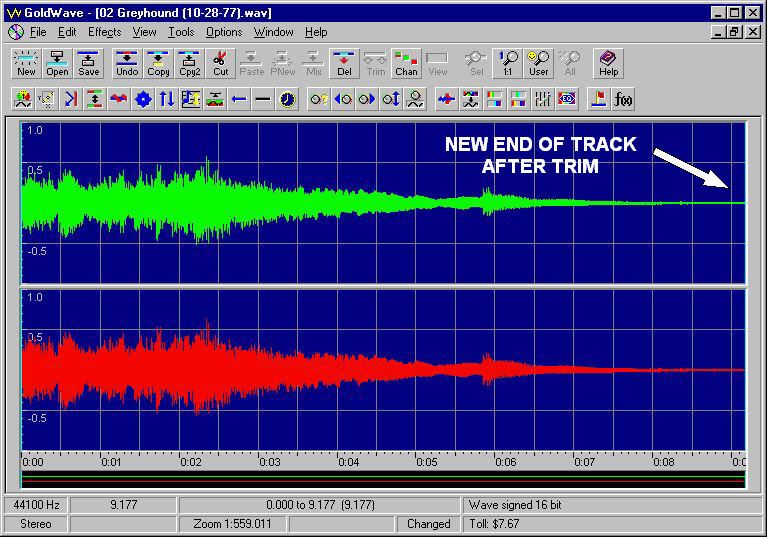
You now have a lot more files to work with, but they are much smaller (probably less than 50 MB each)and you can edit them more quickly. Open each file in turn and edit the introduction and the end of the song. Your goal is to completely eliminate the "non-song" part of the file by either trimming it off or fading in or out. If the song ends or starts on a single note, I try to highlight the portion of the file before or after the note and then just delete the silent part. If the song fades in or out, I try to locate the point just before or after total silence and fade in or out over a period of just a second or two. This has a less obvious effect on the song. Remember, most CD burning software automatically inserts a 2-second silence at the beginning of each track, so you can trim the beginning and the end of the track as closely as you care to.
|
|
|
|
GoldWave Editing
to Trim Individual Tracks
(click on images to enlarge)
Trimming the beginnings and ends of the songs will have an amazing impact on the perceived noise level. The music itself tends to "mask" background noise, including pops, clicks, and scratches. When you "delete" the silent portions of the album between the songs, you create dead silence and the listener will think you've done an outstanding job of filtering the noise, even if you didn't filter it at all. Remember how you could always tell when the next album song was coming up on the turntable or the next song was starting on the tape because you could hear the record's surface noise? Well, our goal has been to eliminate those audible clues to the source material.
|
|
|
|
GoldWave Waveform Editing
to Reduce Pops and Clicks
(click on images to enlarge)
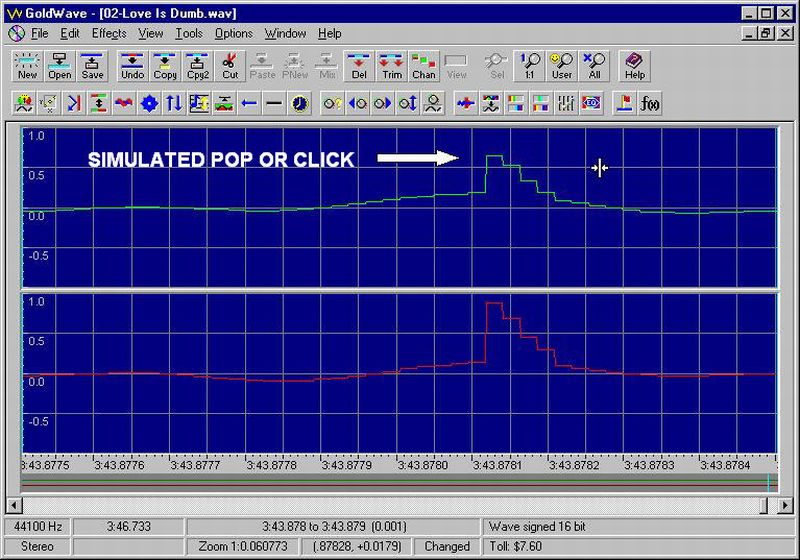
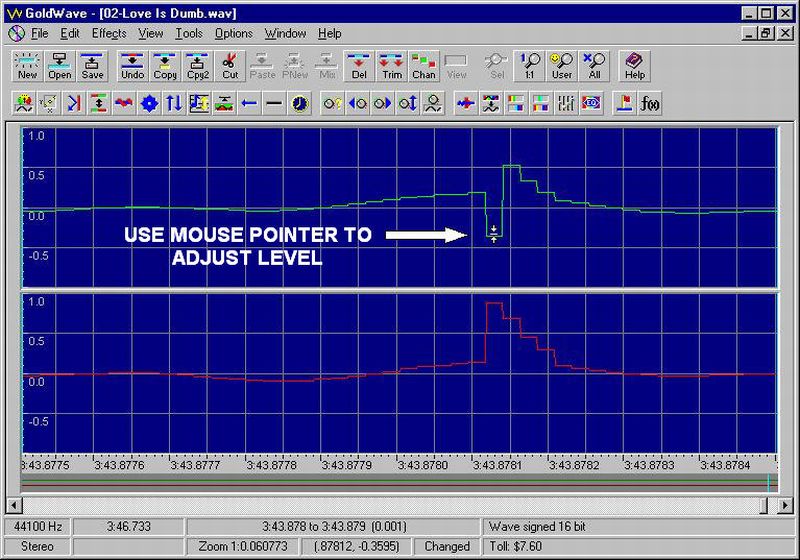
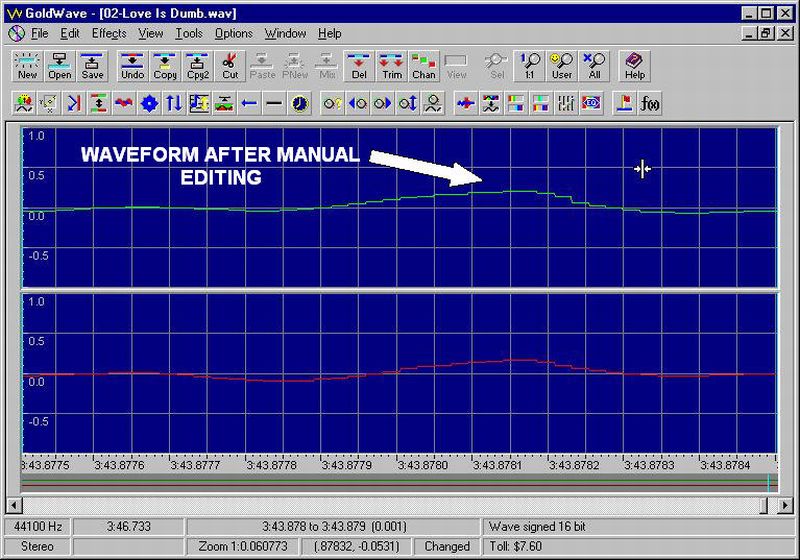
At this point, I usually stop and listen to each song all the way through. In many cases there is still a single pop or click in a song that is quite audible and irritating. This is your chance to get rid of it. Open the file in GoldWave and locate the pop or click. You can then zoom in and view it on a very detailed level, where it will look like a spike going either up or down (or both). You can go into the waveform editing mode in GoldWave by placing the mouse pointer on the waveform. Once you have done this, you can actually "push" it up or down to reduce it in volume. It is possible to clip it out completely, but this usually leaves an audible gap. I recommend just reducing the effect until it is much less noticeable. Remember, you must zoom in order to use this feature. If you still cannot do this, check to see if your file has been "deflashed" by selecting Edit from the menu bar. If "Deflash" is an active option, select it and try editing the waveform again. Another way to remove the click is to highlight the click and then use the "Interpolate" function in GoldWave. This basically connects the two points in the waveform with a "straight line." However, this may leave an audible anomaly in your waveform. Manually removing the click or pop provides the best results.
6. Burn final audio CD directly from WAV files.
At this point, you should have a complete set of files, one for each song or track on the album. Close GoldWave and open your CD burner software. You should be able to create a CD directly from WAV files, so just select the files in the correct track order and burn away! When the CD is created, the files will become CDA files and the typical file name will become "track1.cda".
If you have an MP3 player or some other need for MP3 files, go ahead and make them using the WAV files as the source. Recent versions of GoldWave also have the ability to save WAV files in the MP3 format.
Another bit of wisdom for you: archive your files. Spend a few cents and copy the original album side WAV files to a CD as data files. You can even save the individual songs as data files, if you care to. This will make it possible for you to go back and re-edit the album without having to repeat the entire process and will protect you against losing the files from a hard drive crash.
Well, that's about it! Your total cost for software and hardware (not including your CD burner) should be less than $80...or much less if you have a good sound card and/or don't need the ground loop isolator. If you have any questions, drop me an e-mail and I'll try to help out.